
Are you looking for a creative and unique way to surprise your loved ones with a special gift? Edible bouquets are a fun and delicious alternative to traditional flower arrangements, and they’re perfect for any occasion, from birthdays to Mother’s Day and Valentine’s Day. We have the best tips and ideas for making your own edible bouquets that are sure to impress. So let’s get started!

Edible Fruit Bouquet
It’s true that you can buy an edible bouquet from lots of different online stores. So why would you make your own?
- Much less expensive
- Choose your own seasonal fruits to use
- Include veggies!
- Add a personal touch for the person it is for
- Have fun making it
- Get creative and involve your kids
- Avoid delivery fees and having to order ahead
Supplies and Ingredients Needed
- Metal Cookie Cutters
- Mini Fruit/Veggie Cutters
- Seasonal Fruit: strawberries, blueberries, grapes, pineapple, melon, bananas, apples
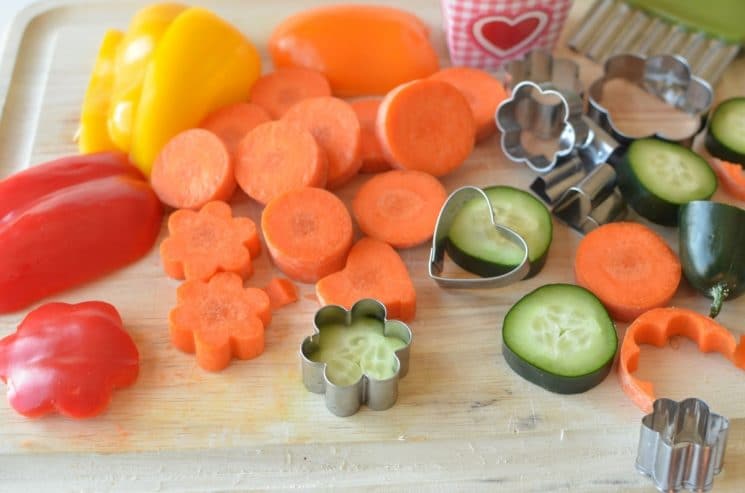
- Seasonal Veggies: bell peppers, carrots, cucumbers
- Wood Skewers
- Mason Jar
- Cute Ribbon
How to Make an Edible Bouquet
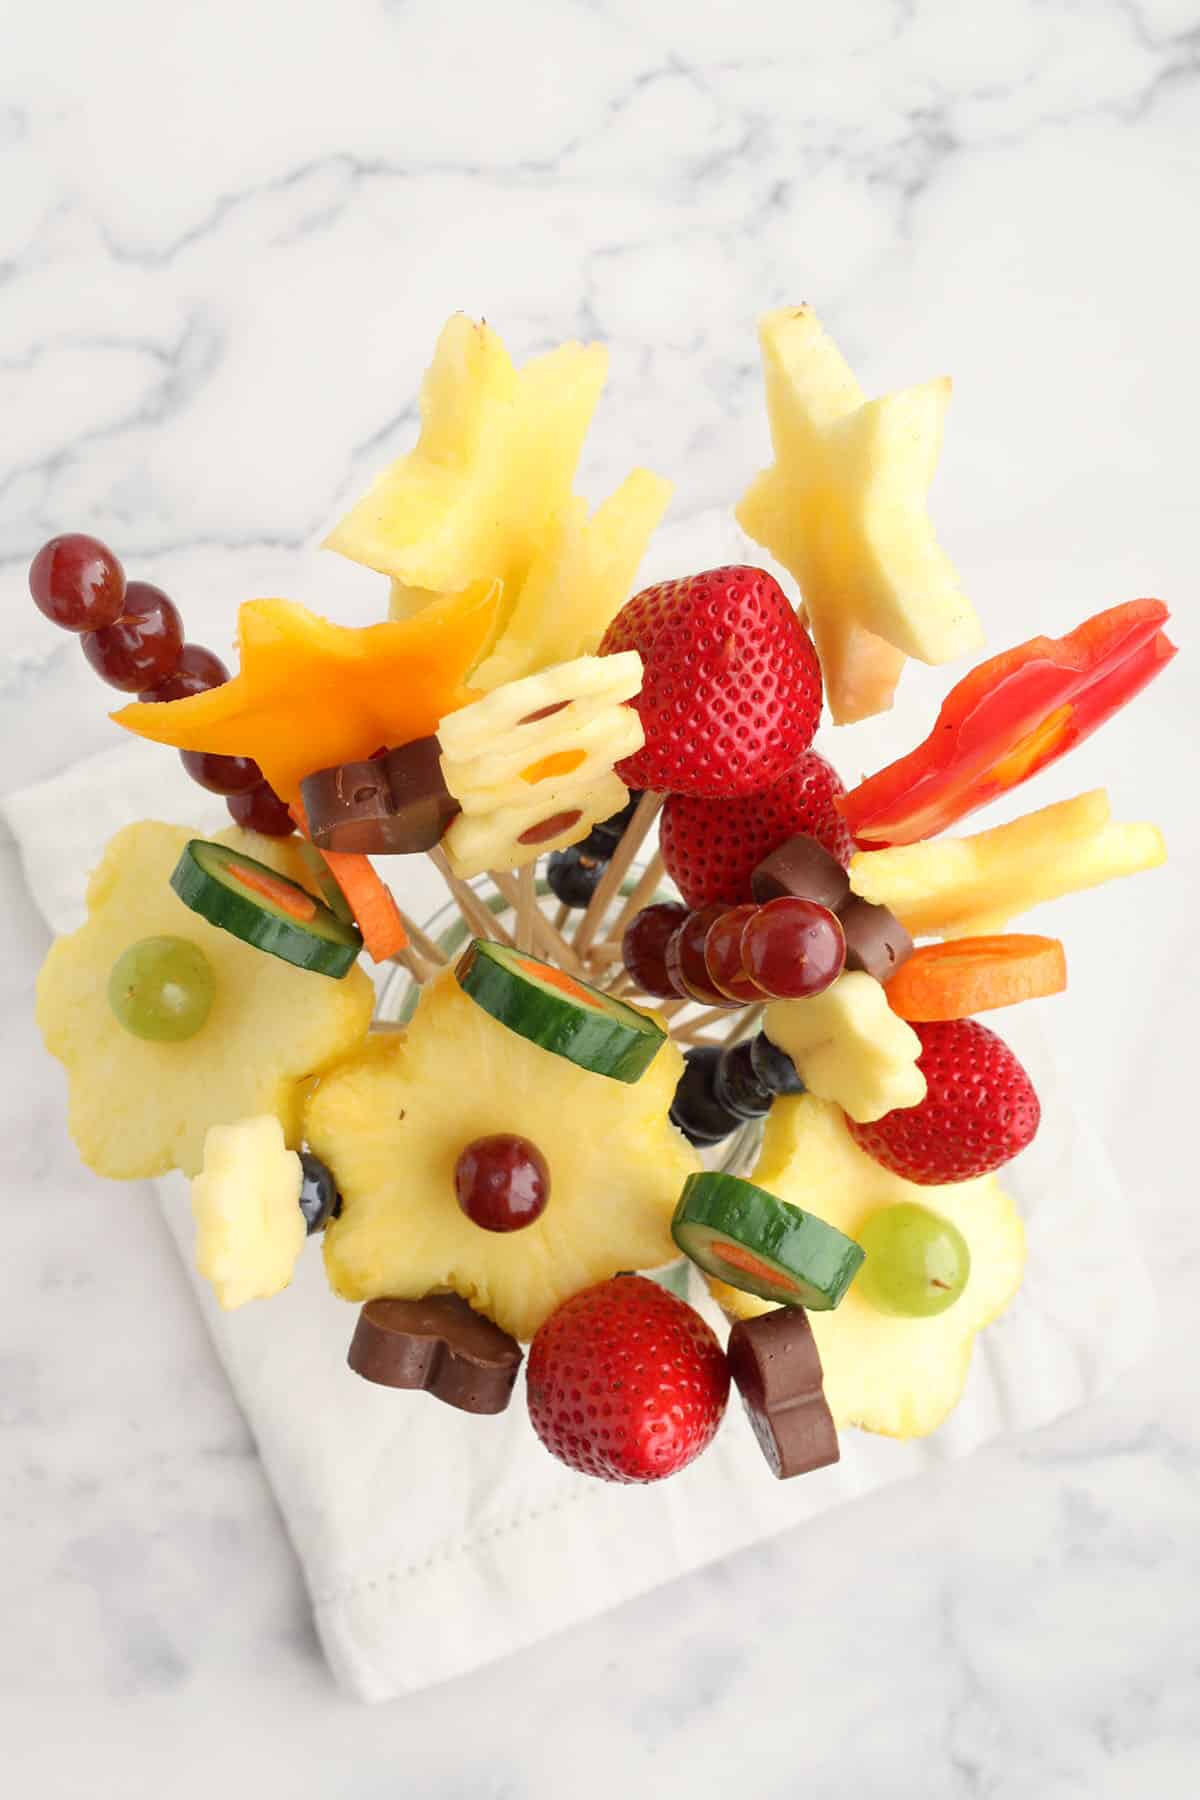
- Choose the fruits and veggies you want to include in your bouquet. Select a variety of colorful and flavorful fruits and veggies that are in season and can be easily skewered. Some good options include strawberries, melons, grapes, pineapple, kiwi, and oranges. Veggie options are cucumbers, carrots, bell peppers.
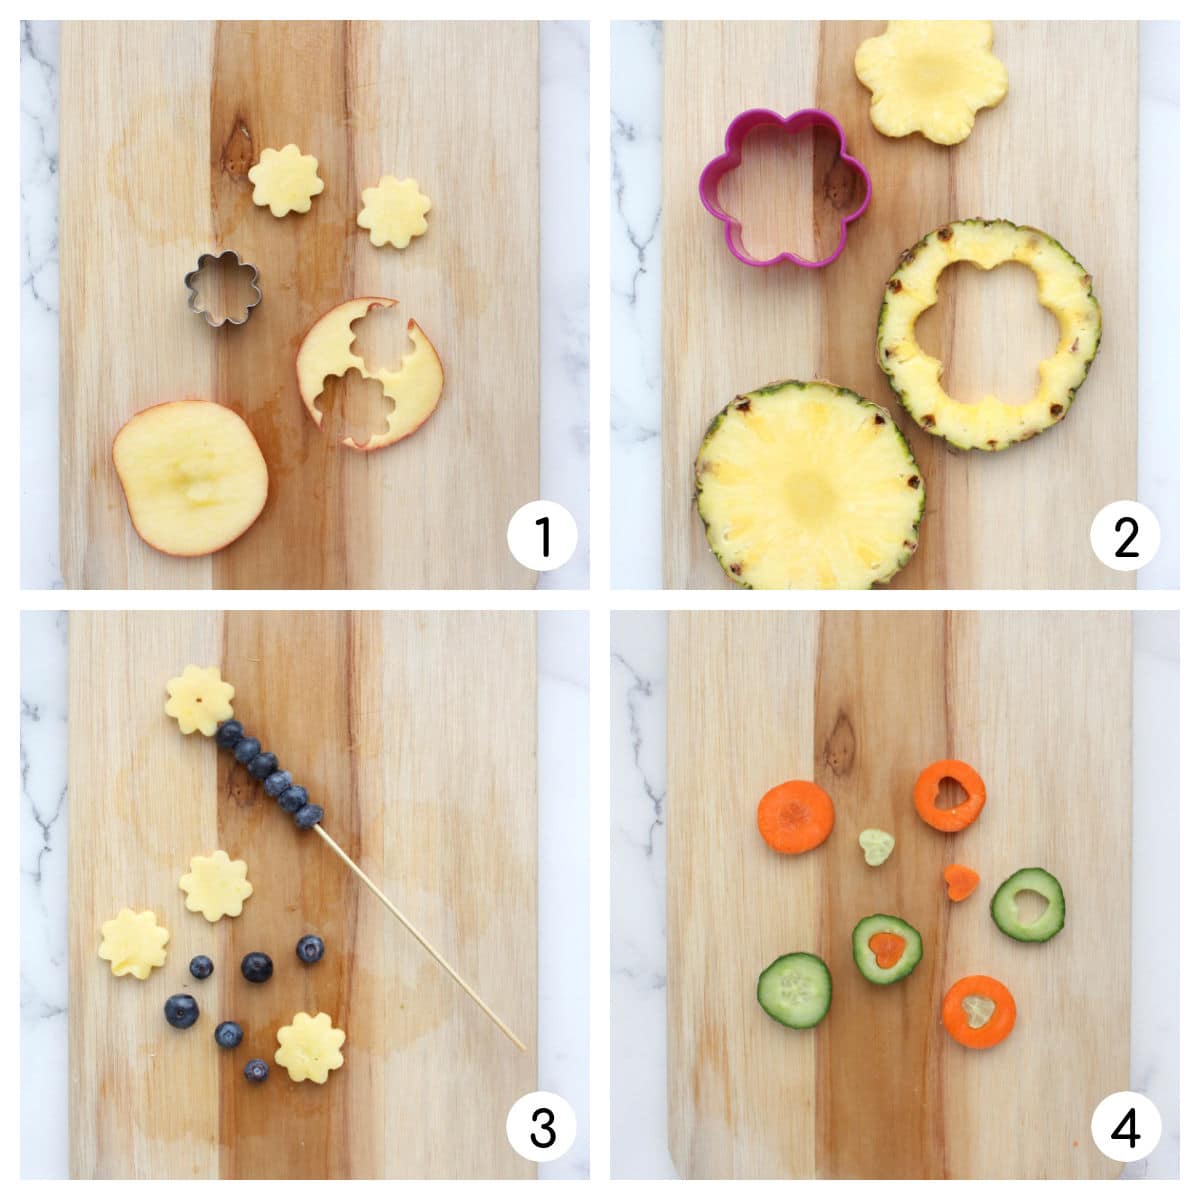
- Prepare the fruit and veggies: Wash and dry all fruits and veggies thoroughly. Cut larger fruits like melons and pineapple into bite-sized pieces, and remove any seeds or stems.
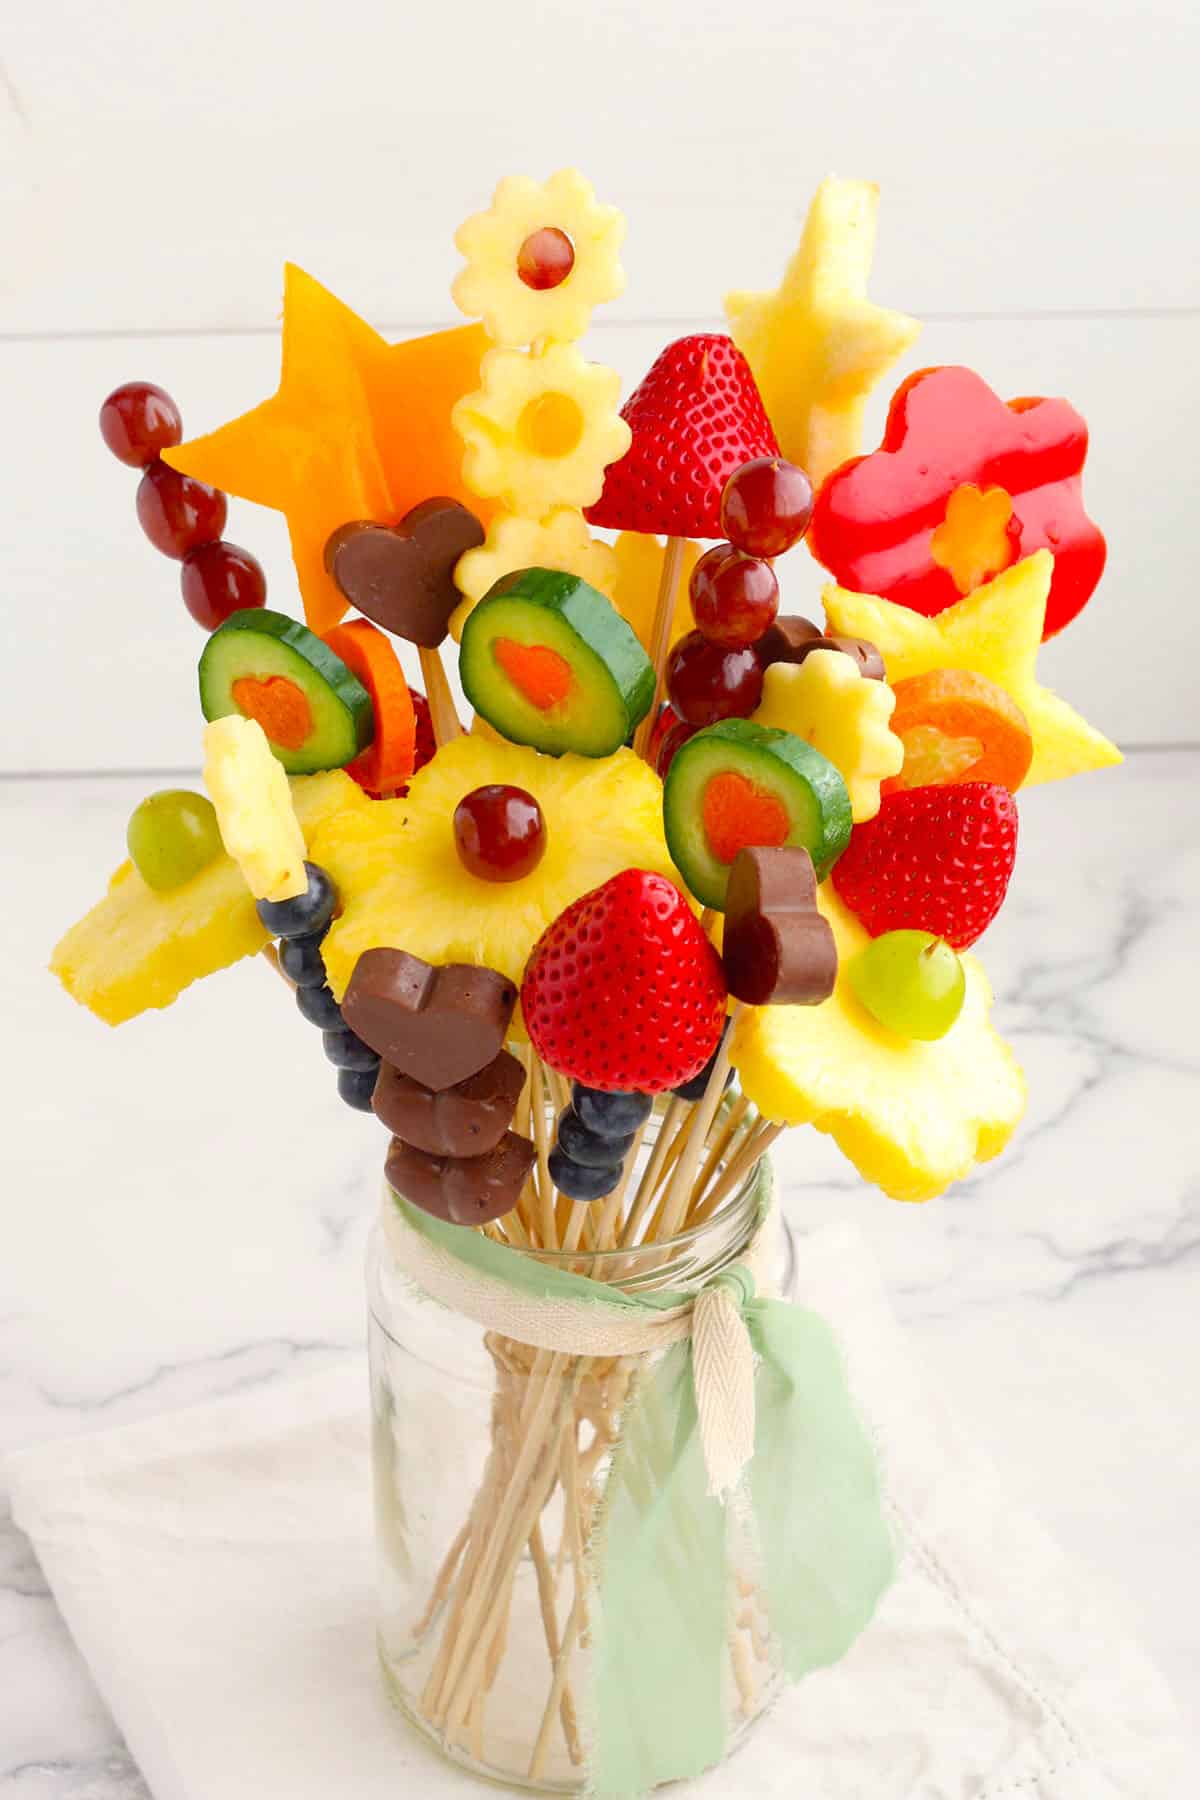
- Choose a container: Select a container that will hold the skewers in place. A mason jar or vase works well, but you can also use a basket. Line the container with floral foam or oasis, which will keep the skewers upright.
- Cut Fruit and Veggies: use cookie cutters to make fun shapes or cut the fruit into bite-sized pieces. Thread the fruits and veggies on skewers in a decorative pattern.
- Arrange the skewers: Insert the skewers into the floral foam or oasis in the container. Place the larger and heavier skewers in the center, and arrange the smaller skewers around them.
- Add finishing touches: Add some greenery, such as mint or basil, around the edges of the container to fill any gaps. You can also add some edible decorations, such as chocolate-covered strawberries or grapes, to make the bouquet look more festive.
- Enjoy: Your edible fruit bouquet is now ready to be enjoyed! You can give it to a friend or family member for Mother’s Day, Valentine’s, or just a thinking of you gift. You can also serve it as a centerpiece.
Tips for Making an Edible Bouquet
- Choose fresh, ripe fruit: Fresh and ripe fruit will taste better and look more appealing in your bouquet. Avoid using overripe or bruised fruit.
- Use a variety of colors: Using a variety of colorful fruits will make your bouquet more visually appealing. Mix and match colors to create an eye-catching display.
- Cut fruit into uniform sizes: Cut your fruit into uniform sizes so that they will be easier to skewer and will look more uniform in your bouquet. Cut the carrots and cucumbers thick enough to hold the stick, but not too thick that it’s too heavy and topples over.
- Use sturdy skewers: Use sturdy wooden or metal skewers that are long enough to hold multiple pieces of fruit. Bamboo skewers work well.
- Experiment with shapes and textures: Use cookie cutters to create fun shapes from the fruit, or try using a melon baller to make small round shapes. Mix and match textures by using both soft and firm fruits.
- Arrange the fruit carefully: Arrange the fruit and veggies in a way that is visually pleasing. Place larger fruits in the center and use smaller fruits to fill in the gaps around the edges.
- Keep the bouquet fresh: To keep your fruit bouquet fresh, store it in the refrigerator until you are ready to serve it. I recommend covering it with plastic wrap. You can also mist the fruit lightly with water to keep it from drying out.
More Edible Gift Ideas

Edible Bouquet
Edible bouquets are a fun and delicious alternative to traditional flower arrangements, and they're perfect for any occasion, from birthdays to Mother's Day and Valentine's Day.
Servings: 6
Calories: 151kcal
Ingredients
- 1 medium pineapple
- 1 medium apple
- 6 large strawberries
- 1 cup grapes
- 1/2 cup blueberries
- 2 medium carrots
- 2 medium cucumbers
- 2 medium bell peppers
Instructions
- Wash and dry all fruits and veggies thoroughly. Cut larger fruits like melons and pineapple into bite-sized pieces, and remove any seeds or stems.
- Use cookie cutters to make fun shapes or cut the fruit into bite-sized pieces. Thread the fruits and veggies on skewers in a decorative pattern.
- Select a container that will hold the skewers in place. Add some greenery, such as mint or basil, around the edges of the container to fill any gaps. You can also add some edible decorations, such as chocolate-covered strawberries or grapes, to make the bouquet look more festive.
- Insert the skewers into the floral foam or oasis in the container. Place the larger and heavier skewers in the center, and arrange the smaller skewers around them.
- Tie a cute bow around the jar or vase and give it to someone to brighten their day!
Nutrition
Calories: 151kcal | Carbohydrates: 38g | Protein: 2g | Fat: 1g | Saturated Fat: 0.1g | Polyunsaturated Fat: 0.2g | Monounsaturated Fat: 0.05g | Sodium: 20mg | Potassium: 536mg | Fiber: 6g | Sugar: 28g | Vitamin A: 4817IU | Vitamin C: 145mg | Calcium: 48mg | Iron: 1mg